Original: $32.61
-65%$32.61
$11.41The Story
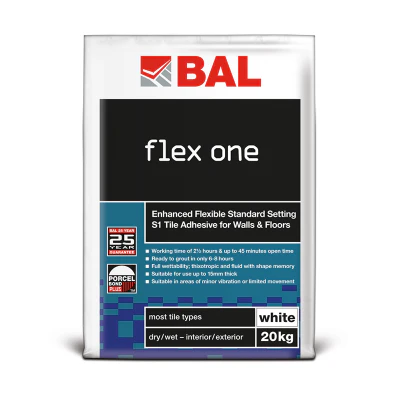
A high-strength, highly flexible, non-slip, water-resistant ready-mixed wall tile adhesive, enhanced with BAL Fibre Strand Technology (FST). Suitable for ceramic tiles up to 300×300mm and porcelain tiles up to 150×150mm, mosaics, and most natural stone. Covers domestic and commercial wet areas including communal showers and commercial kitchens — environments where standard adhesives aren't rated.

Details & Craftsmanship
Every detail has been carefully considered to bring you the perfect product.
Description
A high-strength, highly flexible, non-slip, water-resistant ready-mixed wall tile adhesive, enhanced with BAL Fibre Strand Technology (FST). Suitable for ceramic tiles up to 300×300mm and porcelain tiles up to 150×150mm, mosaics, and most natural stone. Covers domestic and commercial wet areas including communal showers and commercial kitchens — environments where standard adhesives aren't rated.